(Created page with "== Summary == In hangar bay G-12 the Rebels must defeat the final guards, deal with the mysterious Imperial official, warn the approaching Rebel fleet to turnback, and escape ...") Tag: Visual edit |
No edit summary Tag: Visual edit |
||
| Line 1: | Line 1: | ||
| + | {{DISPLAYTITLE:The Final Escape}} |
||
| − | == Summary == |
||
| + | ''Main Page: [[Starfall]]'' |
||
| ⚫ | |||
| + | |||
| ⚫ | |||
== Down to Hangar Bay G-12 == |
== Down to Hangar Bay G-12 == |
||
| − | The vehicle lift easily lowers the |
+ | The vehicle lift easily lowers the heroes to the proper hangar bay. If they go down in an [[AT-ST]], they stand a better chance of success. Waiting for them are six [[Imperial Gunners]]. Also in the hangar is a fully-stocked and ready-to-fly shuttle. As the lift descends, read: |
'''''You descend into hangar bay G-12, noticing the six troopers and the shuttle waiting to depart. In the control tower, a single figure watches your descent. It appears to be a person in Imperial robes, perhaps an official or dignitary of some sort. A hood is drawn over the figure’s head, hiding any recognizable details. Then, over the ship-wide comlink, you hear, ''“Priority Command D-113. Time: five minutes and counting...”''' |
'''''You descend into hangar bay G-12, noticing the six troopers and the shuttle waiting to depart. In the control tower, a single figure watches your descent. It appears to be a person in Imperial robes, perhaps an official or dignitary of some sort. A hood is drawn over the figure’s head, hiding any recognizable details. Then, over the ship-wide comlink, you hear, ''“Priority Command D-113. Time: five minutes and counting...”''' |
||
| − | [[Lira Wessex]] watches from the control tower. The moment the |
+ | [[Lira Wessex]] watches from the control tower. The moment the heroes do anything to suggest that they are not Kolaff, she orders the troopers to attack. The battle should be quick, with the mechanical voice counting down in the background. Blissex points out that the communications equipment in the control tower should be operational and with it they can warn the Alliance fleet. |
| − | While the others battle the troopers, a |
+ | While the others battle the troopers, a hero or two should charge the tower. |
== The Control Tower == |
== The Control Tower == |
||
| − | As the |
+ | As the heroes run toward the control tower, [[Lira Wessex]] pulls a [[Blaster Pistol]] and starts firing. She retreats when things look rough, climbing out onto the catwalk toward a far door. |
| − | With a DC 14 [[Mechanics]] |
+ | With a DC 14 [[Mechanics]] check, a hero can operate the comlink transmitter and warn the fleet. This requires a successful [[Persuasion]] result of 21 or better to convince the fleet that this isn’t an Imperial trick. |
If someone chases after Lira, go to “Lira’s Escape.” |
If someone chases after Lira, go to “Lira’s Escape.” |
||
== Lira’s Escape == |
== Lira’s Escape == |
||
| − | Her identity still hidden beneath her Imperial robes, Lira dodges through the door into the corridor. If any |
+ | Her identity still hidden beneath her Imperial robes, Lira dodges through the door into the corridor. If any heroes chase her, they catch up with her in the hall. Read: |
| − | '''''Standing about 10 meters from you in the center of a corridor intersection is the Imperial official. The official throws back her hood to reveal a beautiful yet dangerous- looking woman. Your caution increases as she pulls a |
+ | '''''Standing about 10 meters from you in the center of a corridor intersection is the Imperial official. The official throws back her hood to reveal a beautiful yet dangerous- looking woman. Your caution increases as she pulls a [[Thermal Detonator]] from the sleeves of her robe. She smiles, ''“Rebel fool. Did you think to defeat Lira Wessex as easily as you did that incompetent named Kolaff?”'' She prepares to toss the grenade when Walex Blissex appears beside you. She hesitates, then smiles and winds up to throw. You both hear the sound of repulsors and servomotors from the connecting passage. A wave of Droids, apparently the same frightened renegades you met earlier, smash into Lira. She quickly disappears beneath the metallic crush, but you notice the grenade come bounding toward you. You catch a glimpse of a silvery Protocol Droid just before the explosion seals the corridor with tons of debris.''''' |
| − | The |
+ | The hero must make a DC 19 [[Initiative]] check to grab Walex and leap from the corridor before the [[Thermal Detonator]] explodes. The corridor is sealed by the explosion, and the only thing to do now is get into the shuttle and take off. |
== The Shuttle == |
== The Shuttle == |
||
| − | The shuttle crew, consisting of two |
+ | The shuttle crew, consisting of two [[Technicians (TotG)|Technicians]], tries to hold off the heroes. Once the crew is defeated, the heroes can enter the shuttle. Any hero can operate the shuttle. It is completely fueled and supplied, as per Kolaff’s orders. Still, a DC 21 [[Pilot]] check is needed to pull out of the bay. Then a DC 16 check is needed to accelerate away from the impending explosion. |
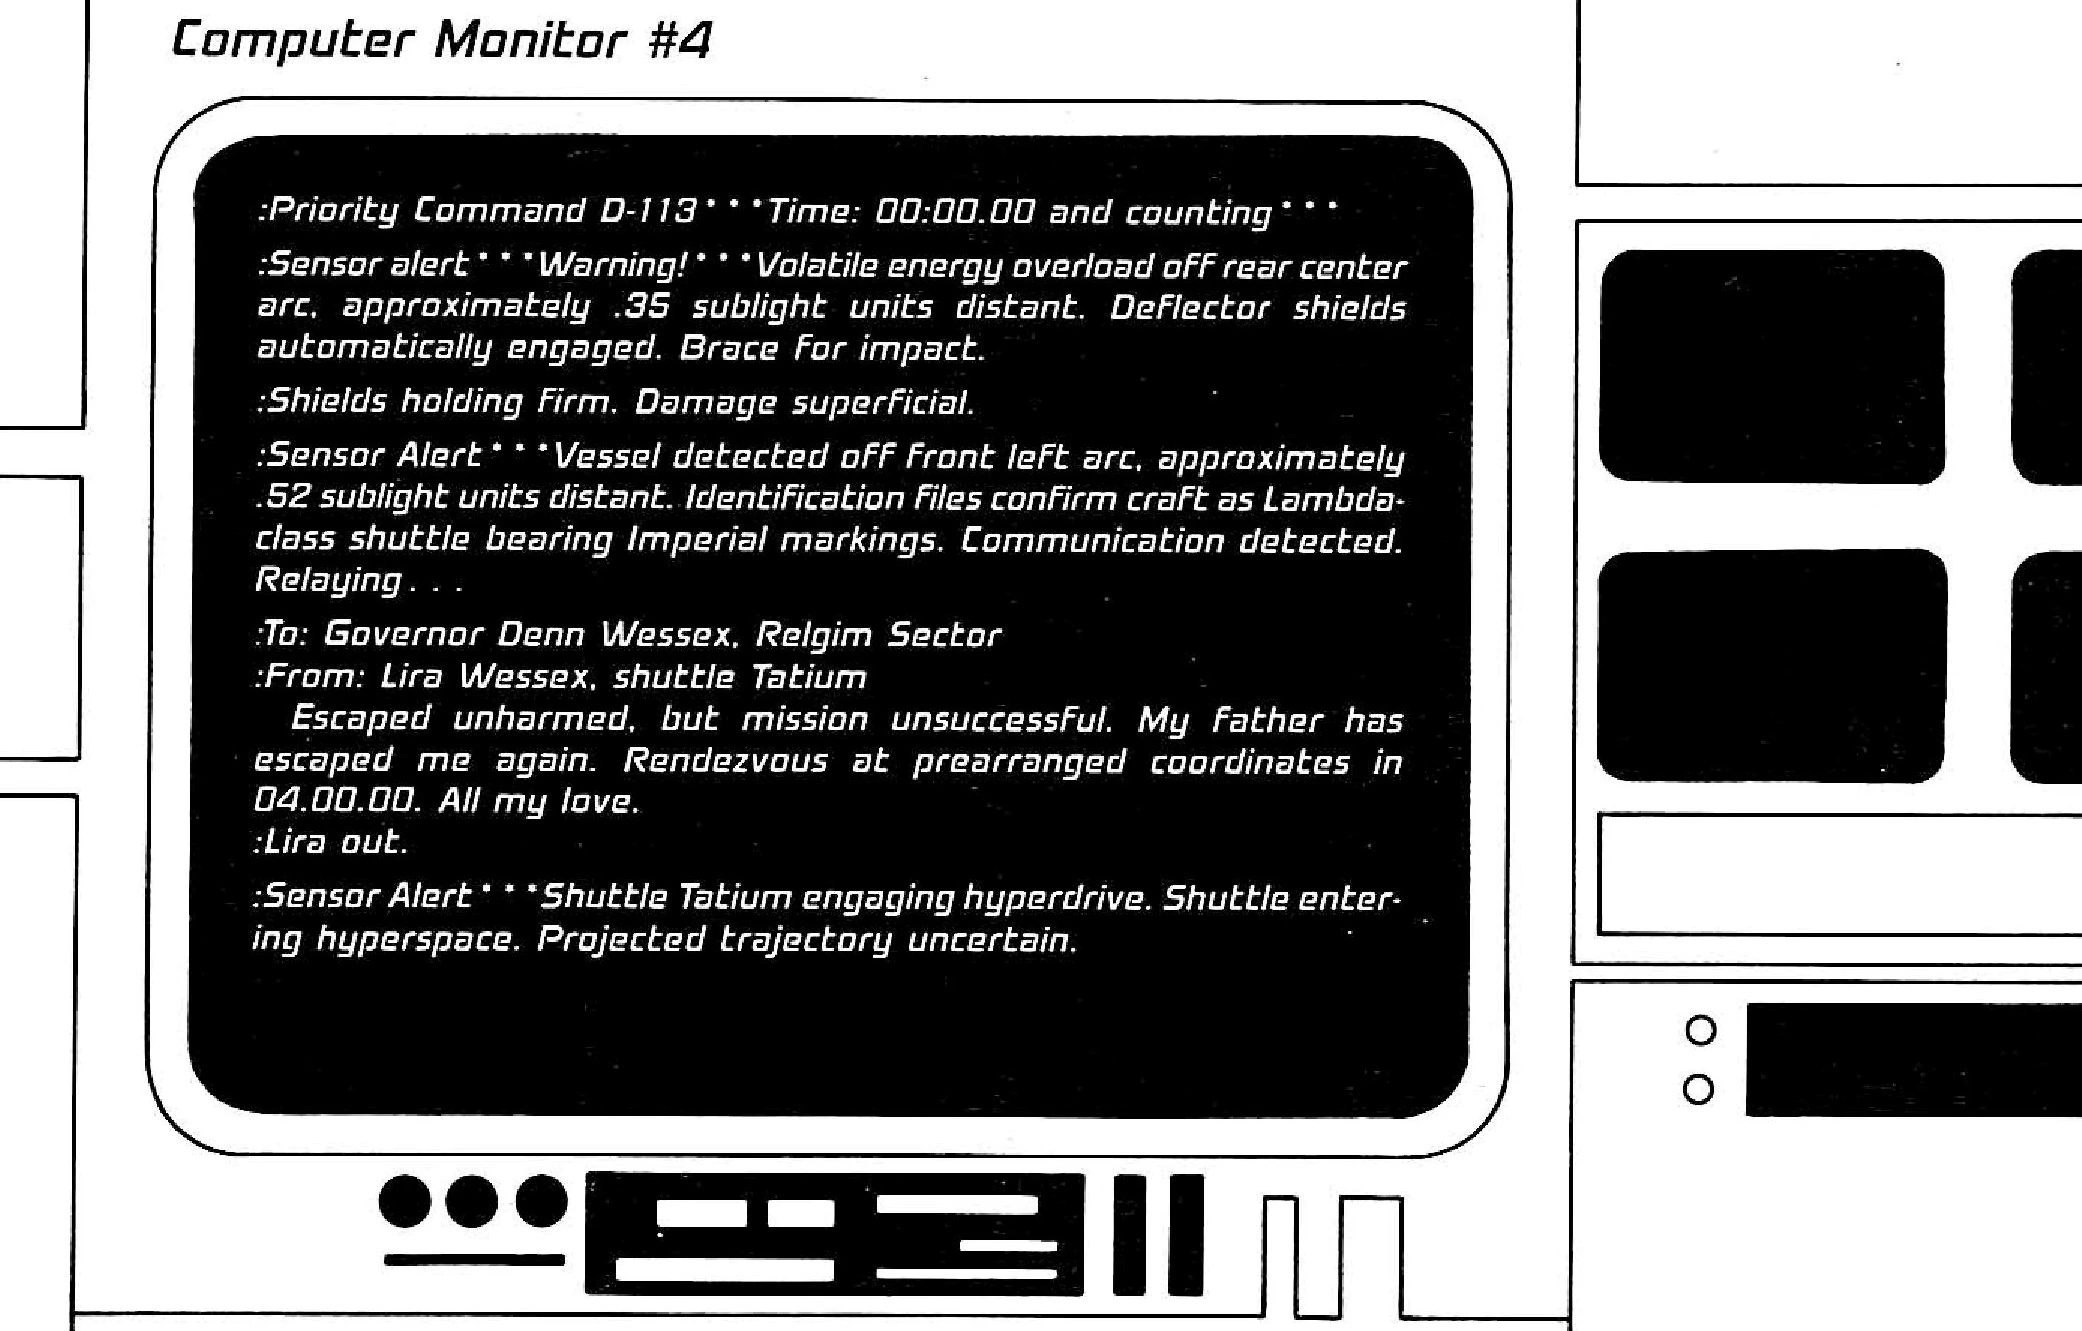
| − | The shuttle’s comlink continues to receive the countdown, and as it reaches zero the computer provides one last bit of information. Hand the players “Computer Monitor # |
+ | The shuttle’s comlink continues to receive the countdown, and as it reaches zero the computer provides one last bit of information. Hand the players “Computer Monitor #4,” below. |
| + | [[File:Comp4.jpg|centre|thumb|700x700px]] |
||
== Operation Starfall == |
== Operation Starfall == |
||
| − | As the explosion rocks the shuttle carrying the |
+ | As the explosion rocks the shuttle carrying the heroes, one last communication crackles over their subspace comlink. Read: |
| − | '''''Your subspace com-units crackle to life, and a strong, calm voice addresses you. ''“This is Starfall leader calling Imperial shuttle. As everything you told us seems to be correct, including the recent destruction of Subjugator, please feel free to come aboard our flagship as personal guests of the Alliance. May the Force be with you. Captain Torrie out.”''' |
+ | '''''Your subspace com-units crackle to life, and a strong, calm voice addresses you. ''“This is Starfall leader calling Imperial shuttle. As everything you told us seems to be correct, including the recent destruction of ''Subjugator'', please feel free to come aboard our flagship as personal guests of the Alliance. May the Force be with you. Captain Torrie out.”''' |
== Rewards == |
== Rewards == |
||
| − | Upon returning to base, the |
+ | Upon returning to base, the heroes are met by General Dodonna, who ceremoniously promotes each of them. Those who already hold a rank are promoted to the next step up, while those without are bestowed the rank of lieutenant. For saving his “Silly old hide,” Walex Blissex designs a special “Toy” for each of the heroes (Using his [[Tech Specialist]] Feat). Grant the players between 1 to 2 1/2 levels for the successful completion of the adventure. Reward extra [[Force Points]] to those who showed extreme courage and ingenuity throughout the adventure as well as replacing the [[Force Points]] spent by those who used them properly. |
| + | [[Category:Homebrew Content]] |
||
Revision as of 22:23, 20 February 2020
Main Page: Starfall
In hangar bay G-12 the Rebels must defeat the final guards, deal with the mysterious Imperial official, warn the approaching Rebel fleet to turn back, and escape the Star Destroyer before it explodes. Hold on to your flight helmets as time becomes the true enemy in the closing minutes of Starfall.
Down to Hangar Bay G-12
The vehicle lift easily lowers the heroes to the proper hangar bay. If they go down in an AT-ST, they stand a better chance of success. Waiting for them are six Imperial Gunners. Also in the hangar is a fully-stocked and ready-to-fly shuttle. As the lift descends, read:
You descend into hangar bay G-12, noticing the six troopers and the shuttle waiting to depart. In the control tower, a single figure watches your descent. It appears to be a person in Imperial robes, perhaps an official or dignitary of some sort. A hood is drawn over the figure’s head, hiding any recognizable details. Then, over the ship-wide comlink, you hear, “Priority Command D-113. Time: five minutes and counting...”
Lira Wessex watches from the control tower. The moment the heroes do anything to suggest that they are not Kolaff, she orders the troopers to attack. The battle should be quick, with the mechanical voice counting down in the background. Blissex points out that the communications equipment in the control tower should be operational and with it they can warn the Alliance fleet.
While the others battle the troopers, a hero or two should charge the tower.
The Control Tower
As the heroes run toward the control tower, Lira Wessex pulls a Blaster Pistol and starts firing. She retreats when things look rough, climbing out onto the catwalk toward a far door.
With a DC 14 Mechanics check, a hero can operate the comlink transmitter and warn the fleet. This requires a successful Persuasion result of 21 or better to convince the fleet that this isn’t an Imperial trick.
If someone chases after Lira, go to “Lira’s Escape.”
Lira’s Escape
Her identity still hidden beneath her Imperial robes, Lira dodges through the door into the corridor. If any heroes chase her, they catch up with her in the hall. Read:
Standing about 10 meters from you in the center of a corridor intersection is the Imperial official. The official throws back her hood to reveal a beautiful yet dangerous- looking woman. Your caution increases as she pulls a Thermal Detonator from the sleeves of her robe. She smiles, “Rebel fool. Did you think to defeat Lira Wessex as easily as you did that incompetent named Kolaff?” She prepares to toss the grenade when Walex Blissex appears beside you. She hesitates, then smiles and winds up to throw. You both hear the sound of repulsors and servomotors from the connecting passage. A wave of Droids, apparently the same frightened renegades you met earlier, smash into Lira. She quickly disappears beneath the metallic crush, but you notice the grenade come bounding toward you. You catch a glimpse of a silvery Protocol Droid just before the explosion seals the corridor with tons of debris.
The hero must make a DC 19 Initiative check to grab Walex and leap from the corridor before the Thermal Detonator explodes. The corridor is sealed by the explosion, and the only thing to do now is get into the shuttle and take off.
The Shuttle
The shuttle crew, consisting of two Technicians, tries to hold off the heroes. Once the crew is defeated, the heroes can enter the shuttle. Any hero can operate the shuttle. It is completely fueled and supplied, as per Kolaff’s orders. Still, a DC 21 Pilot check is needed to pull out of the bay. Then a DC 16 check is needed to accelerate away from the impending explosion.
The shuttle’s comlink continues to receive the countdown, and as it reaches zero the computer provides one last bit of information. Hand the players “Computer Monitor #4,” below.
Operation Starfall
As the explosion rocks the shuttle carrying the heroes, one last communication crackles over their subspace comlink. Read:
Your subspace com-units crackle to life, and a strong, calm voice addresses you. “This is Starfall leader calling Imperial shuttle. As everything you told us seems to be correct, including the recent destruction of Subjugator, please feel free to come aboard our flagship as personal guests of the Alliance. May the Force be with you. Captain Torrie out.”
Rewards
Upon returning to base, the heroes are met by General Dodonna, who ceremoniously promotes each of them. Those who already hold a rank are promoted to the next step up, while those without are bestowed the rank of lieutenant. For saving his “Silly old hide,” Walex Blissex designs a special “Toy” for each of the heroes (Using his Tech Specialist Feat). Grant the players between 1 to 2 1/2 levels for the successful completion of the adventure. Reward extra Force Points to those who showed extreme courage and ingenuity throughout the adventure as well as replacing the Force Points spent by those who used them properly.