Tag: Visual edit |
No edit summary Tag: Visual edit |
||
| (4 intermediate revisions by 2 users not shown) | |||
| Line 12: | Line 12: | ||
Some of the more curious players may still wish to explore a good deal of the giant Star Destroyer, however. In this case, you should let them- to an extent. Troop concentration, heavy damage, or simple inaccessibility should keep the heroes away from places you don’t want them to go. For example, if a particularly gung-ho group decides that they want to take over ''Subjugator's'' bridge, they will almost definitely meet with more resistance than they can handle. But keep in mind that, as heroes, they should always be left with a chance to succeed, no matter what the odds. |
Some of the more curious players may still wish to explore a good deal of the giant Star Destroyer, however. In this case, you should let them- to an extent. Troop concentration, heavy damage, or simple inaccessibility should keep the heroes away from places you don’t want them to go. For example, if a particularly gung-ho group decides that they want to take over ''Subjugator's'' bridge, they will almost definitely meet with more resistance than they can handle. But keep in mind that, as heroes, they should always be left with a chance to succeed, no matter what the odds. |
||
| + | [[File:Subjugator-page-001.jpg|centre|thumb|700x700px]] |
||
== The Guide == |
== The Guide == |
||
The following guide serves as a basic overview of ''Subjugator's'' inner workings and overall status in its damaged state. The descriptions given here are general, and you should add greater detail whenever possible. Try to use your imagination to embellish the descriptions of specific locations. The troop concentrations given should be adjusted according to the party’s size and condition. |
The following guide serves as a basic overview of ''Subjugator's'' inner workings and overall status in its damaged state. The descriptions given here are general, and you should add greater detail whenever possible. Try to use your imagination to embellish the descriptions of specific locations. The troop concentrations given should be adjusted according to the party’s size and condition. |
||
| − | The sections described below are clearly marked on the |
+ | The sections described below are clearly marked on the above map. |
=== Personnel === |
=== Personnel === |
||
| Line 41: | Line 42: | ||
=== Engineering Section === |
=== Engineering Section === |
||
| + | Engineers and technicians constantly bustle about this area in an effort to keep ''Subjugator's ''power on line. Upon entering the engineering section, the heroes are likely to be perceived as technicians and asked to lend a hand in the repairs. [[Imperial Gunners]] are posted at critical systems stations only, and the Rebels should be able to wander this area somewhat freely, provided no one becomes suspicious of them. |
||
| − | [[Category:Homebrew Content]] |
||
| + | |||
| + | The engineering section is a fairly dangerous place, however, as violent equipment collapses or radiation leaks may occur without warning. For as long as the heroes remain in this area, random rolls should be made periodically to determine whether or not they are affected by these occurrences. A roll of 11 from a 1d12 roll indicates an equipment collapse (As [[Falling Objects]] (Large)), and 12 is a radiation leak (As [[Radiation]] (Moderate). |
||
| + | |||
| + | Built around the Star Destroyer’s giant engines and power cells, this area is irregularly designed, and has many hidden corners, passageways, crawl spaces and compartments in which to hide. Walex Blissex can help the heroes find these places in moments of crisis. Near the engine control core, many of the numerous catwalks necessary for gaining access to certain sections have collapsed or are hanging on by the merest of threads. Consequently, movement is slow and perilous, and whole sections have been or are in danger of being cut-off entirely. |
||
| + | |||
| + | === Hangar Decks === |
||
| + | The hangar entry port opens into a large hollowed flight compartment. The walls of the flight compartment are lined with variously-sized hangar bays, ranging from small starfighter bays to large shuttle holds. The bays connect to vehicle maintenance shops that cover the bottom levels of the hangar decks, and to huge vehicle storage facilities that fill the top levels. Levels are connected by giant lift platforms that rise and lower from deck to deck, and by repulsorlift shafts for more direct movement. |
||
| + | |||
| + | This is the second most heavily guarded area of the ship. Imperial troops patrol the hangar decks with relative frequency, moving in groups of four to nine soldiers. Once Kolaff becomes aware that Rebels are loose in his ship, this area goes on total alert. Anyone without proper clearance and the right uniforms will be attacked on sight. |
||
| + | |||
| + | The upper levels of the hangar decks have sustained major damage, resulting in the loss of most of the stored vehicles. Virtually all ships were lost in the space battle or in the resulting damage to ''Subjugator''. These storage decks provide a twisted landscape of bent corridors, crushed walls, and shattered equipment. Rising out of the rubble are the shadowy forms of damaged shuttles, pulverized [[AT-ATs]], and ruined [[TIE Fighters]]. Little in this area is of use to the heroes. With some concentrated searching, the Rebels can find four [[Speeder Bikes]], two [[Blaster Cannon|Blaster Cannons]], and a cache of three [[Blaster Pistols]]. |
||
| + | |||
| + | The hangar bays themselves, however, are another matter. While many bays have sustained some damage and many of the carried craft were lost in the fighting, some things remain in working order. One bay contains a flight (Four) of [[TIE Fighters]], one holds an Imperial Shuttle, and yet another contains four [[AT-ST]] scout walkers. |
||
| + | |||
| + | Maintenance shops on the lower levels suffered a similar fate as the top levels. Being on the outer edge of the ship, these areas consequently took the brunt of the Rebel fleet’s attack. One chamber remains intact in this area. It contains an [[AT-AT]] walker, standing and facing the entrance. With the diminished lighting and damaged ship structure, the [[AT-AT]] should startle the heroes if they enter this level. But the walker itself is in a state of repair, with many circuits and power modules lying about as its overhaul was interrupted by the battle. |
||
| + | |||
| + | === Living Quarters === |
||
| + | ''Subjugator'' has three main areas for living quarters. The modest crew living section, the spacious officer’s row, and the combat personnel quarters. Damage in these areas ranges from light but noticeable to heavy and almost impassable. The crew and combat personnel living areas are made up of large barracks connected by small, twisting corridors. The apartments in officer’s row consist of three-person chambers and large single person studios. |
||
| + | |||
| + | Many displaced crew members, cut off from their posts during the battle, have fled to their quarters in the intermittent quiet. There are no troops stationed in any of the living quarters, but any soldiers cut off from their posts may be roaming these corridors. |
||
| + | |||
| + | Power has been reduced in these areas due to greater needs elsewhere in the ship. Some areas are totally without power, creating cold, dark pockets throughout. Members of the crew have very little in terms of personal belongings, but should the heroes explore the officer’s quarters, they will find quite a wealth of personal treasure including exotic equipment, credit vouchers, and black market items. |
||
| + | |||
| + | === Damaged Areas === |
||
| + | Gaping battle scars tear across almost the entire surface of the crippled ''Subjugator'', sometimes ripping a gash four or five decks deep. These areas are extremely hazardous to travel, but may be the only way for the fugitive Rebels to elude their pursuers. |
||
| + | |||
| + | Visually, these damaged areas are shocking. The torn and twisted superstructure juts out in all directions, thrusting massive pipes and slabs of hull up through decks from floor to ceiling. Certain sections are so thoroughly destroyed, they are completely inaccessible. Others may have gaping holes ripped through them, exposing the [[Vacuum]] of space. Still others have caved-in floors or ceilings. |
||
| + | |||
| + | Traveling through damaged areas is painstakingly slow as obstacles must constantly be circumvented. The heroes will find themselves scaling huge chasms ripped through multiple decks, their hands and knees, and even dodging still-falling debris. In addition, [[Breath Masks]] must be used in certain areas. As they move close to a damaged section, the heroes notice the air becoming thinner. Fortunately, masks can be found hanging on the walls in all of ''Subjugator's'' outer decks for just such an emergency. |
||
| + | |||
| + | There are numerous hazards which make traveling damaged areas ill-advised. In many spots, the partially collapsed superstructure may be unstable. Both ceiling cave-in and floor collapse present a constant threat. Walex Blissex will be a tremendous help, as his engineering skills may be able to detect many unstable spots. The Rebels can detect things as well, making appropriate [[Perception]] or [[Mechanics]] skill checks of DC 21. Still, the Rebels may not always have a choice, and may often be forced to cross an unstable area. |
||
| + | |||
| + | Severed power lines, radiation leaks, and the constant explosions that rock the ship from somewhere deep within the engineering section create additional dangers as well. |
||
| + | |||
| + | As Gamemaster, use these hazards to enhance the mood and atmosphere of the adventure. For example, a character should not be killed without warning by a sudden floor collapse. Rather, have that character chased by Imperial troops until the floor in front of him suddenly collapses, and he must choose between jumping the perilous pit or facing a deadly shower of blaster fire. |
||
| + | |||
| + | == Overall Ship Status == |
||
| + | ''Subjugator'' is at battle-alert condition. The mighty Star Destroyer, its power vastly depleted, operates on two of its six power cells. All shields have been obliterated, and most weapons systems have been damaged or destroyed. The powerful DeLuxFIux [[Hyperdrive]] has suffered irreparable damage. Captain Kolaff has diverted most of the remaining energy into the weakened sublight engines, shutting the rest down completely in an effort to make ''Subjugator'' appear more heavily damaged than it is. |
||
| + | |||
| + | Inside the ship, chaos abounds. Many crew members are trapped or displaced, and Kolaff has paid them absolutely no attention. [[Blast Doors]] all across the ship have automatically closed, sealing-off many decks completely. |
||
| + | |||
| + | The ship’s internal comlink system constantly crackles with orders, some of which may occasionally help the Rebels, such as “Rifle squad P-36 to the detention center.” Also, the constant blaring of the battle-alert klaxon helps to mask most sounds the Rebels may make. |
||
| + | |||
| + | Strangely, most of the Star Destroyer’s Droid population is missing. Conversations pertaining to this rattle among crew members, and an occasional reference to this can be heard over the comlink system. |
||
| + | |||
| + | Despite the devastating damage and loss of life sustained by ''Subjugator'', the crew remains remarkably upbeat. They have seen their captain hold his own against the odds, and morale is high. Left with so few troops, Kolaff has decided not to spread his forces too thin. Instead, he concentrates his troops in critical areas, and assigns “Search and Destroy” teams to dispatch the annoying fugitives, once he becomes aware of their activity.[[Category:Homebrew Content]] |
||
Revision as of 22:22, 1 February 2020
Main Page: Starfall
Because running an adventure in a setting as vast and intricate as a Victory-Class Star Destroyer presents unique problems and challenges, this guide is presented for ease of play.
The storyline follows the most logical route for the heroes to take through the Star Destroyer. It is also the route suggested by Walex Blissex. This path is detailed with mood, descriptions, encounters and events. If the heroes decide to deviate from this route, let them. But in order to fully describe every corridor and chamber in Subjugator, we would need a book many times larger than the one you are now reading. Instead, this Gamemaster’s Guide presents some general descriptions about the Star Destroyer, taking into account its condition at the start of the adventure.
One further note. If your players do deviate from Blissex’s route, you will still need to use the encounters and events presented in the adventure, as those advance the story. Just have them occur wherever the heroes wander.
Handling the Curious Player
One of the drawbacks of providing players with such an open area to explore is that they feel obligated to wander every which way. While heroes should be free to roam far afield, excessive wandering can slow an adventure’s plot to a dead crawl. That isn’t in the spirit of Star Wars. In this adventure, we have built in a number of “Plot Devices” to prevent excessive wandering. One plot device is the pressing time constraints the heroes operate under. Not only is the Star Destroyer falling apart around them, but the Rebels quickly discover that the vessel has been set to self-destruct (Which will destroy the heroes and the approaching Alliance fleet). These time constraints are constantly brought to mind by NPCs and “Cutaways” throughout the adventure.
Some of the more curious players may still wish to explore a good deal of the giant Star Destroyer, however. In this case, you should let them- to an extent. Troop concentration, heavy damage, or simple inaccessibility should keep the heroes away from places you don’t want them to go. For example, if a particularly gung-ho group decides that they want to take over Subjugator's bridge, they will almost definitely meet with more resistance than they can handle. But keep in mind that, as heroes, they should always be left with a chance to succeed, no matter what the odds.
The Guide
The following guide serves as a basic overview of Subjugator's inner workings and overall status in its damaged state. The descriptions given here are general, and you should add greater detail whenever possible. Try to use your imagination to embellish the descriptions of specific locations. The troop concentrations given should be adjusted according to the party’s size and condition.
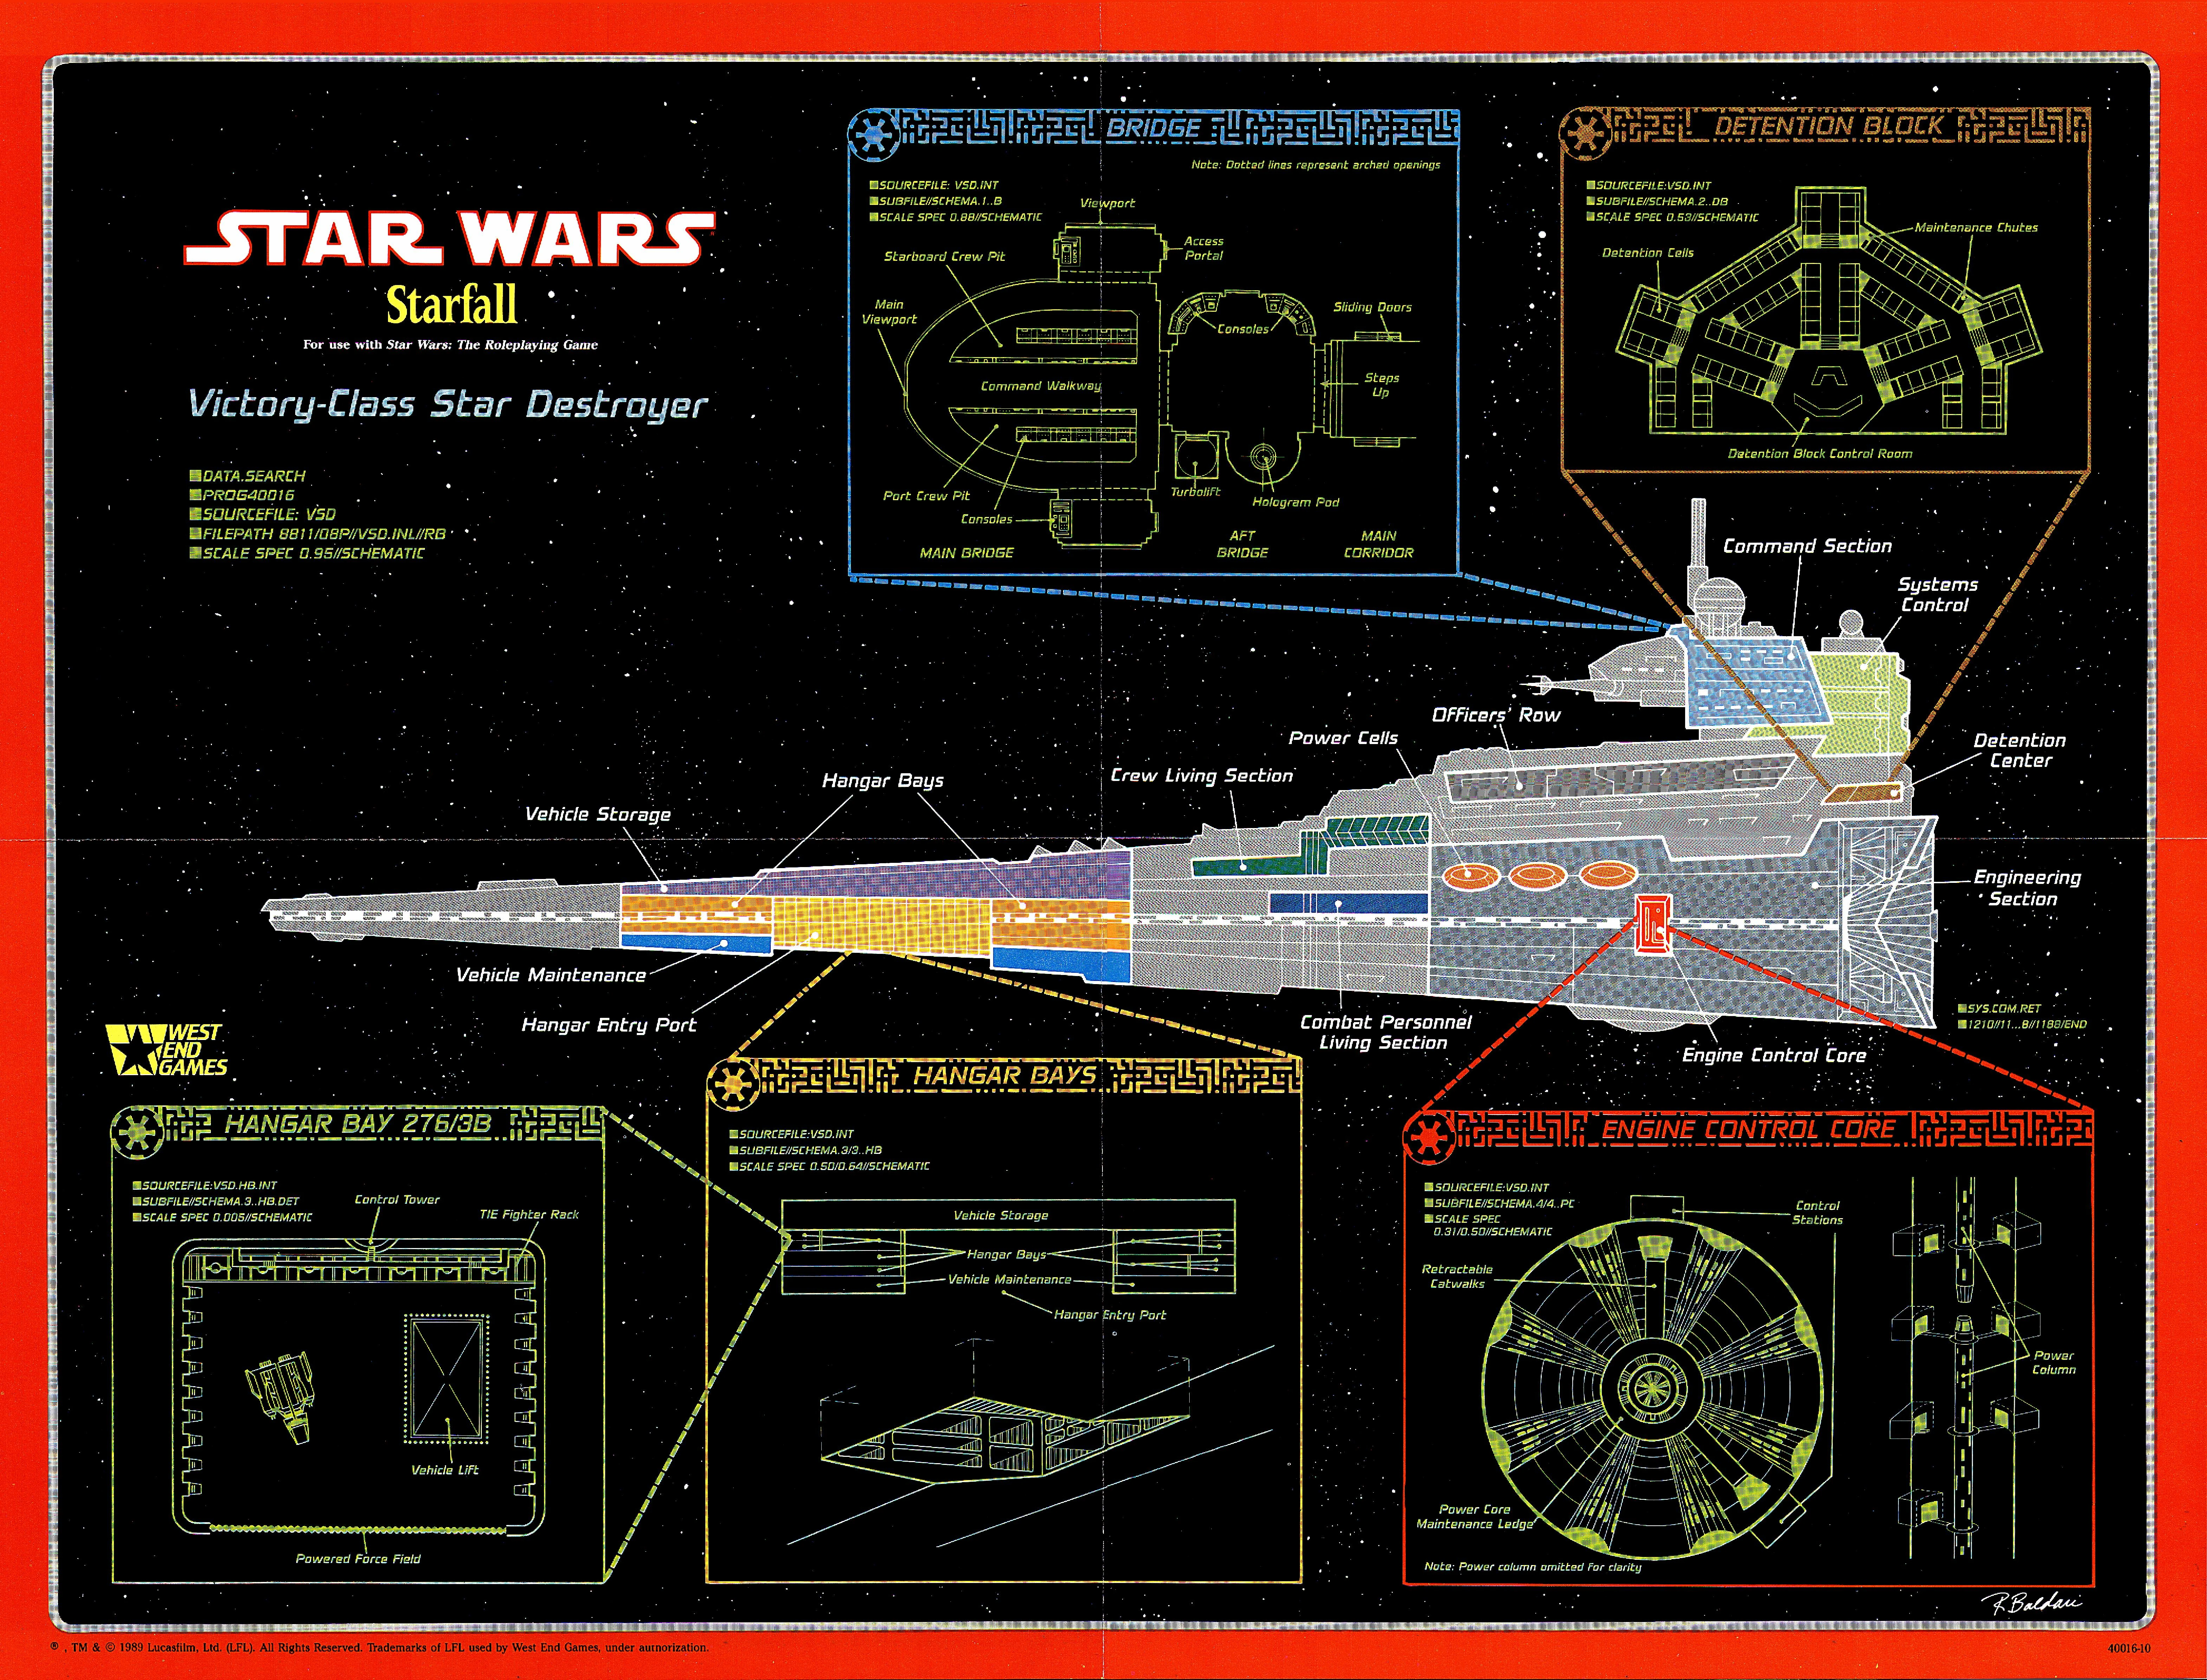
The sections described below are clearly marked on the above map.
Personnel
Aside from the various technicians, mechanics and systems operators occupying the Star Destroyer, Subjugator also has combat personnel that the heroes interact with the most. Anyone else can be detailed using General Units (Unless otherwise noted in the text). Subjugator is commonly populated by the following:
- Stormtroopers
- Imperial Gunners
- MSE-6 Repair Droids
- Because of the lack of manpower, Captain Kolaff has converted most of the MSE-6 “Mouse Droids” to simple patrol duty. Basically, they have been programmed to record activity throughout the damaged ship, especially in areas no longer occupied by the crew. When these menial Droids run into the heroes, they have one round to react. The Mouse Droid comes to a complete stop, briefly records the disturbance that stopped its programmed patrol course, then zooms back the way it came. Once it begins to flee, the Droid transfers its information to the security officer on the bridge for analysis, then resumes a secondary patrol pattern.
Command Section and Systems Control
Since the attack and subsequent damage sustained by Subjugator, most of the ship’s personnel have congregated in the command section. Control of most of the ship’s systems has been taken over by the undamaged computers in the systems control section, but many of these tasks are being handled by backup machinery that is having trouble rerouting so many systems at once.
Normally, command personnel and staff monitor systems operations all over the ship from these levels. Now they are actually handling tasks that they previously only supervised.
The largest contingent of troops can be found in these connected areas. Patrols of three Stormtroopers wander the corridors on regular intervals, while other troops are stationed at important intersections and access ports.
The communications station monitors broadcasts coming from the Alliance fleet, as well as any Rebel intership communications. This station is guarded by 15 Stormtroopers and six Imperial Gunners.
Twenty Stormtroopers guard the access to the bridge. All turbolifts that still operate in the area stop at a transfer station that has been converted to the bridge access guard station. At this transfer area, those people who want to proceed to the bridge must switch to the one lift that leads to the aft bridge section- provided they can get past the Stormtroopers.
In addition, wherever possible Captain Kolaff has closed and locked Blast Doors. These can be opened using Control Panels positioned next to each door, if a person knows the access codes. Without the codes, it takes 10 rounds to cut through a locked Blast Door using up a blaster's entire Power Pack. Otherwise, a DC 26 Use Computer check to needed to break the codes.
Physically, this area is almost completely intact. Very little damage can be perceived here. Power is at 70 percent throughout the command and systems control sections, and any equipment accessed by the heroes should be functional. While these areas have functional work stations, they can serve as traps for the heroes. Whenever a work station or computer terminal is accessed without inputting the proper security code, the security officer on the bridge is alerted. He informs Kolaff and sends the nearest Stormtrooper patrol to investigate the situation. Should the heroes check before using the station, a DC 21 Use Computer check makes them aware that the equipment is being monitored.
Engineering Section
Engineers and technicians constantly bustle about this area in an effort to keep Subjugator's power on line. Upon entering the engineering section, the heroes are likely to be perceived as technicians and asked to lend a hand in the repairs. Imperial Gunners are posted at critical systems stations only, and the Rebels should be able to wander this area somewhat freely, provided no one becomes suspicious of them.
The engineering section is a fairly dangerous place, however, as violent equipment collapses or radiation leaks may occur without warning. For as long as the heroes remain in this area, random rolls should be made periodically to determine whether or not they are affected by these occurrences. A roll of 11 from a 1d12 roll indicates an equipment collapse (As Falling Objects (Large)), and 12 is a radiation leak (As Radiation (Moderate).
Built around the Star Destroyer’s giant engines and power cells, this area is irregularly designed, and has many hidden corners, passageways, crawl spaces and compartments in which to hide. Walex Blissex can help the heroes find these places in moments of crisis. Near the engine control core, many of the numerous catwalks necessary for gaining access to certain sections have collapsed or are hanging on by the merest of threads. Consequently, movement is slow and perilous, and whole sections have been or are in danger of being cut-off entirely.
Hangar Decks
The hangar entry port opens into a large hollowed flight compartment. The walls of the flight compartment are lined with variously-sized hangar bays, ranging from small starfighter bays to large shuttle holds. The bays connect to vehicle maintenance shops that cover the bottom levels of the hangar decks, and to huge vehicle storage facilities that fill the top levels. Levels are connected by giant lift platforms that rise and lower from deck to deck, and by repulsorlift shafts for more direct movement.
This is the second most heavily guarded area of the ship. Imperial troops patrol the hangar decks with relative frequency, moving in groups of four to nine soldiers. Once Kolaff becomes aware that Rebels are loose in his ship, this area goes on total alert. Anyone without proper clearance and the right uniforms will be attacked on sight.
The upper levels of the hangar decks have sustained major damage, resulting in the loss of most of the stored vehicles. Virtually all ships were lost in the space battle or in the resulting damage to Subjugator. These storage decks provide a twisted landscape of bent corridors, crushed walls, and shattered equipment. Rising out of the rubble are the shadowy forms of damaged shuttles, pulverized AT-ATs, and ruined TIE Fighters. Little in this area is of use to the heroes. With some concentrated searching, the Rebels can find four Speeder Bikes, two Blaster Cannons, and a cache of three Blaster Pistols.
The hangar bays themselves, however, are another matter. While many bays have sustained some damage and many of the carried craft were lost in the fighting, some things remain in working order. One bay contains a flight (Four) of TIE Fighters, one holds an Imperial Shuttle, and yet another contains four AT-ST scout walkers.
Maintenance shops on the lower levels suffered a similar fate as the top levels. Being on the outer edge of the ship, these areas consequently took the brunt of the Rebel fleet’s attack. One chamber remains intact in this area. It contains an AT-AT walker, standing and facing the entrance. With the diminished lighting and damaged ship structure, the AT-AT should startle the heroes if they enter this level. But the walker itself is in a state of repair, with many circuits and power modules lying about as its overhaul was interrupted by the battle.
Living Quarters
Subjugator has three main areas for living quarters. The modest crew living section, the spacious officer’s row, and the combat personnel quarters. Damage in these areas ranges from light but noticeable to heavy and almost impassable. The crew and combat personnel living areas are made up of large barracks connected by small, twisting corridors. The apartments in officer’s row consist of three-person chambers and large single person studios.
Many displaced crew members, cut off from their posts during the battle, have fled to their quarters in the intermittent quiet. There are no troops stationed in any of the living quarters, but any soldiers cut off from their posts may be roaming these corridors.
Power has been reduced in these areas due to greater needs elsewhere in the ship. Some areas are totally without power, creating cold, dark pockets throughout. Members of the crew have very little in terms of personal belongings, but should the heroes explore the officer’s quarters, they will find quite a wealth of personal treasure including exotic equipment, credit vouchers, and black market items.
Damaged Areas
Gaping battle scars tear across almost the entire surface of the crippled Subjugator, sometimes ripping a gash four or five decks deep. These areas are extremely hazardous to travel, but may be the only way for the fugitive Rebels to elude their pursuers.
Visually, these damaged areas are shocking. The torn and twisted superstructure juts out in all directions, thrusting massive pipes and slabs of hull up through decks from floor to ceiling. Certain sections are so thoroughly destroyed, they are completely inaccessible. Others may have gaping holes ripped through them, exposing the Vacuum of space. Still others have caved-in floors or ceilings.
Traveling through damaged areas is painstakingly slow as obstacles must constantly be circumvented. The heroes will find themselves scaling huge chasms ripped through multiple decks, their hands and knees, and even dodging still-falling debris. In addition, Breath Masks must be used in certain areas. As they move close to a damaged section, the heroes notice the air becoming thinner. Fortunately, masks can be found hanging on the walls in all of Subjugator's outer decks for just such an emergency.
There are numerous hazards which make traveling damaged areas ill-advised. In many spots, the partially collapsed superstructure may be unstable. Both ceiling cave-in and floor collapse present a constant threat. Walex Blissex will be a tremendous help, as his engineering skills may be able to detect many unstable spots. The Rebels can detect things as well, making appropriate Perception or Mechanics skill checks of DC 21. Still, the Rebels may not always have a choice, and may often be forced to cross an unstable area.
Severed power lines, radiation leaks, and the constant explosions that rock the ship from somewhere deep within the engineering section create additional dangers as well.
As Gamemaster, use these hazards to enhance the mood and atmosphere of the adventure. For example, a character should not be killed without warning by a sudden floor collapse. Rather, have that character chased by Imperial troops until the floor in front of him suddenly collapses, and he must choose between jumping the perilous pit or facing a deadly shower of blaster fire.
Overall Ship Status
Subjugator is at battle-alert condition. The mighty Star Destroyer, its power vastly depleted, operates on two of its six power cells. All shields have been obliterated, and most weapons systems have been damaged or destroyed. The powerful DeLuxFIux Hyperdrive has suffered irreparable damage. Captain Kolaff has diverted most of the remaining energy into the weakened sublight engines, shutting the rest down completely in an effort to make Subjugator appear more heavily damaged than it is.
Inside the ship, chaos abounds. Many crew members are trapped or displaced, and Kolaff has paid them absolutely no attention. Blast Doors all across the ship have automatically closed, sealing-off many decks completely.
The ship’s internal comlink system constantly crackles with orders, some of which may occasionally help the Rebels, such as “Rifle squad P-36 to the detention center.” Also, the constant blaring of the battle-alert klaxon helps to mask most sounds the Rebels may make.
Strangely, most of the Star Destroyer’s Droid population is missing. Conversations pertaining to this rattle among crew members, and an occasional reference to this can be heard over the comlink system.
Despite the devastating damage and loss of life sustained by Subjugator, the crew remains remarkably upbeat. They have seen their captain hold his own against the odds, and morale is high. Left with so few troops, Kolaff has decided not to spread his forces too thin. Instead, he concentrates his troops in critical areas, and assigns “Search and Destroy” teams to dispatch the annoying fugitives, once he becomes aware of their activity.