Reference Book: Star Wars Saga Edition Dawn of Defiance
Main Page: Jaws of the Sarlacc
Preceded by Part 1: A Bold Plan
Once the heroes have dealt with the patrol, they have the opportunity to land on the Golan Defense Platform. Assuming they have taken some steps to disguise their ship's sensor profile and IFF Transponders, they can land in the docking bay without challenge thanks to the Droid traffic controllers' lack of suspicion. If they took no such responses, the platform might open fire on the heroes' ship, but they can still blast their way into the docking bay in a matter of rounds.
Once inside, the heroes know they need to seize control of the defense platform to turn its weapons on the Super Star Destroyer. First, however, they must deal with the station's defenders. Their arrival has not gone completely unnoticed, and they will face a challenging series of encounters to reach the central reactor control chamber.
As the Gamemaster, you might find it tempting to turn the following series of encounters into little more than a linear group of challenges, offering the heroes no choice in the matter. The encounters described below are meant to be used in any order that you see fit (with one exception; see "Security Corridor" below), although they do make some basic assumptions about the order in which most heroes will tackle them. As with the planning of the operation in Part 1: A Bold Plan, give the heroes a chance to come up with their own methods for reaching the reactor. Then, each time they reach a good point, drop in one of these encounters to challenge them.
As the heroes progress toward the central reactor chamber, take into account the following basic information about the platform.
The Station Interior[]
The Golan Defense Platform orbiting Byss is designed primarily to defend and anchor the Super Star Destroyer at the center of the Sarlacc Project. The defense platform is considered to be a Battlestation with a CL of 20. You can use this to improvise any challenges or hazards the heroes might face along the way.
- Command Bridge: The primary command bridge for the Golan platform has been shut down in favor of rerouting control to an Backup Bridge, located near the central reactor core for the whole platform. If the heroes reach the primary command bridge, they find it abandoned.
- Computer Systems: The station's main computer system has a Will Defense of 31 and is one of the most sophisticated computers currently used by the Empire. However, since the Empire staffs the station with Droids, the central computer isn't always used to its full potential.
- Computers in auxiliary areas, such as corridors and nonessential locations, have a Will Defense of 26 and can be used to gain access to the station's main computer.
- Hangar Bays: The Golan platform has three main docking bays, one of which is used for ships other than Starfighters. Each of the other two bays holds a squadron of 12 TIE Fighters, which the heroes might have encountered already.
- Docking Bay 616 is the shuttle docking bay and is the one through which the heroes likely enter and exit.
- Patrols: Standard security protocol for the Golan platform calls for two Byss Elite Stormtrooper Squads per patrol, each commanded by an Imperial Officer. The Imperial Officer in these patrols carry Code Cylinders for auxiliary computer systems (but not the main computer system).
- Security Control Rooms: Each level of the space platform has its own Security Control Room. These control rooms remain in constant contact with the Backup Bridge.
- Each one has security control computers with a Will Defense of 26, is staffed by four Imperial Officers, and has a Byss Elite Stormtrooper Squad defending the control room.
- Sensors: The sensors in the station are extremely sophisticated. When properly focused, they can detect everything from the number of beings in a room to the current health of each one. However, such focus is typically unneeded, and the Droids controlling many of the station's sensors rarely perform such a sweep.
- Slicing the station's sensors to make them ignore the heroes requires a DC 31 Use Computer check, made from a Security Control Room.
- Skill DCs: For the purposes of improvising Skill Checks during this adventure, consider using the following DCs based on the difficulty of the task being performed: Easy, DC 26; Medium, DC 31; Moderate, DC 36; Hard, DC 41.
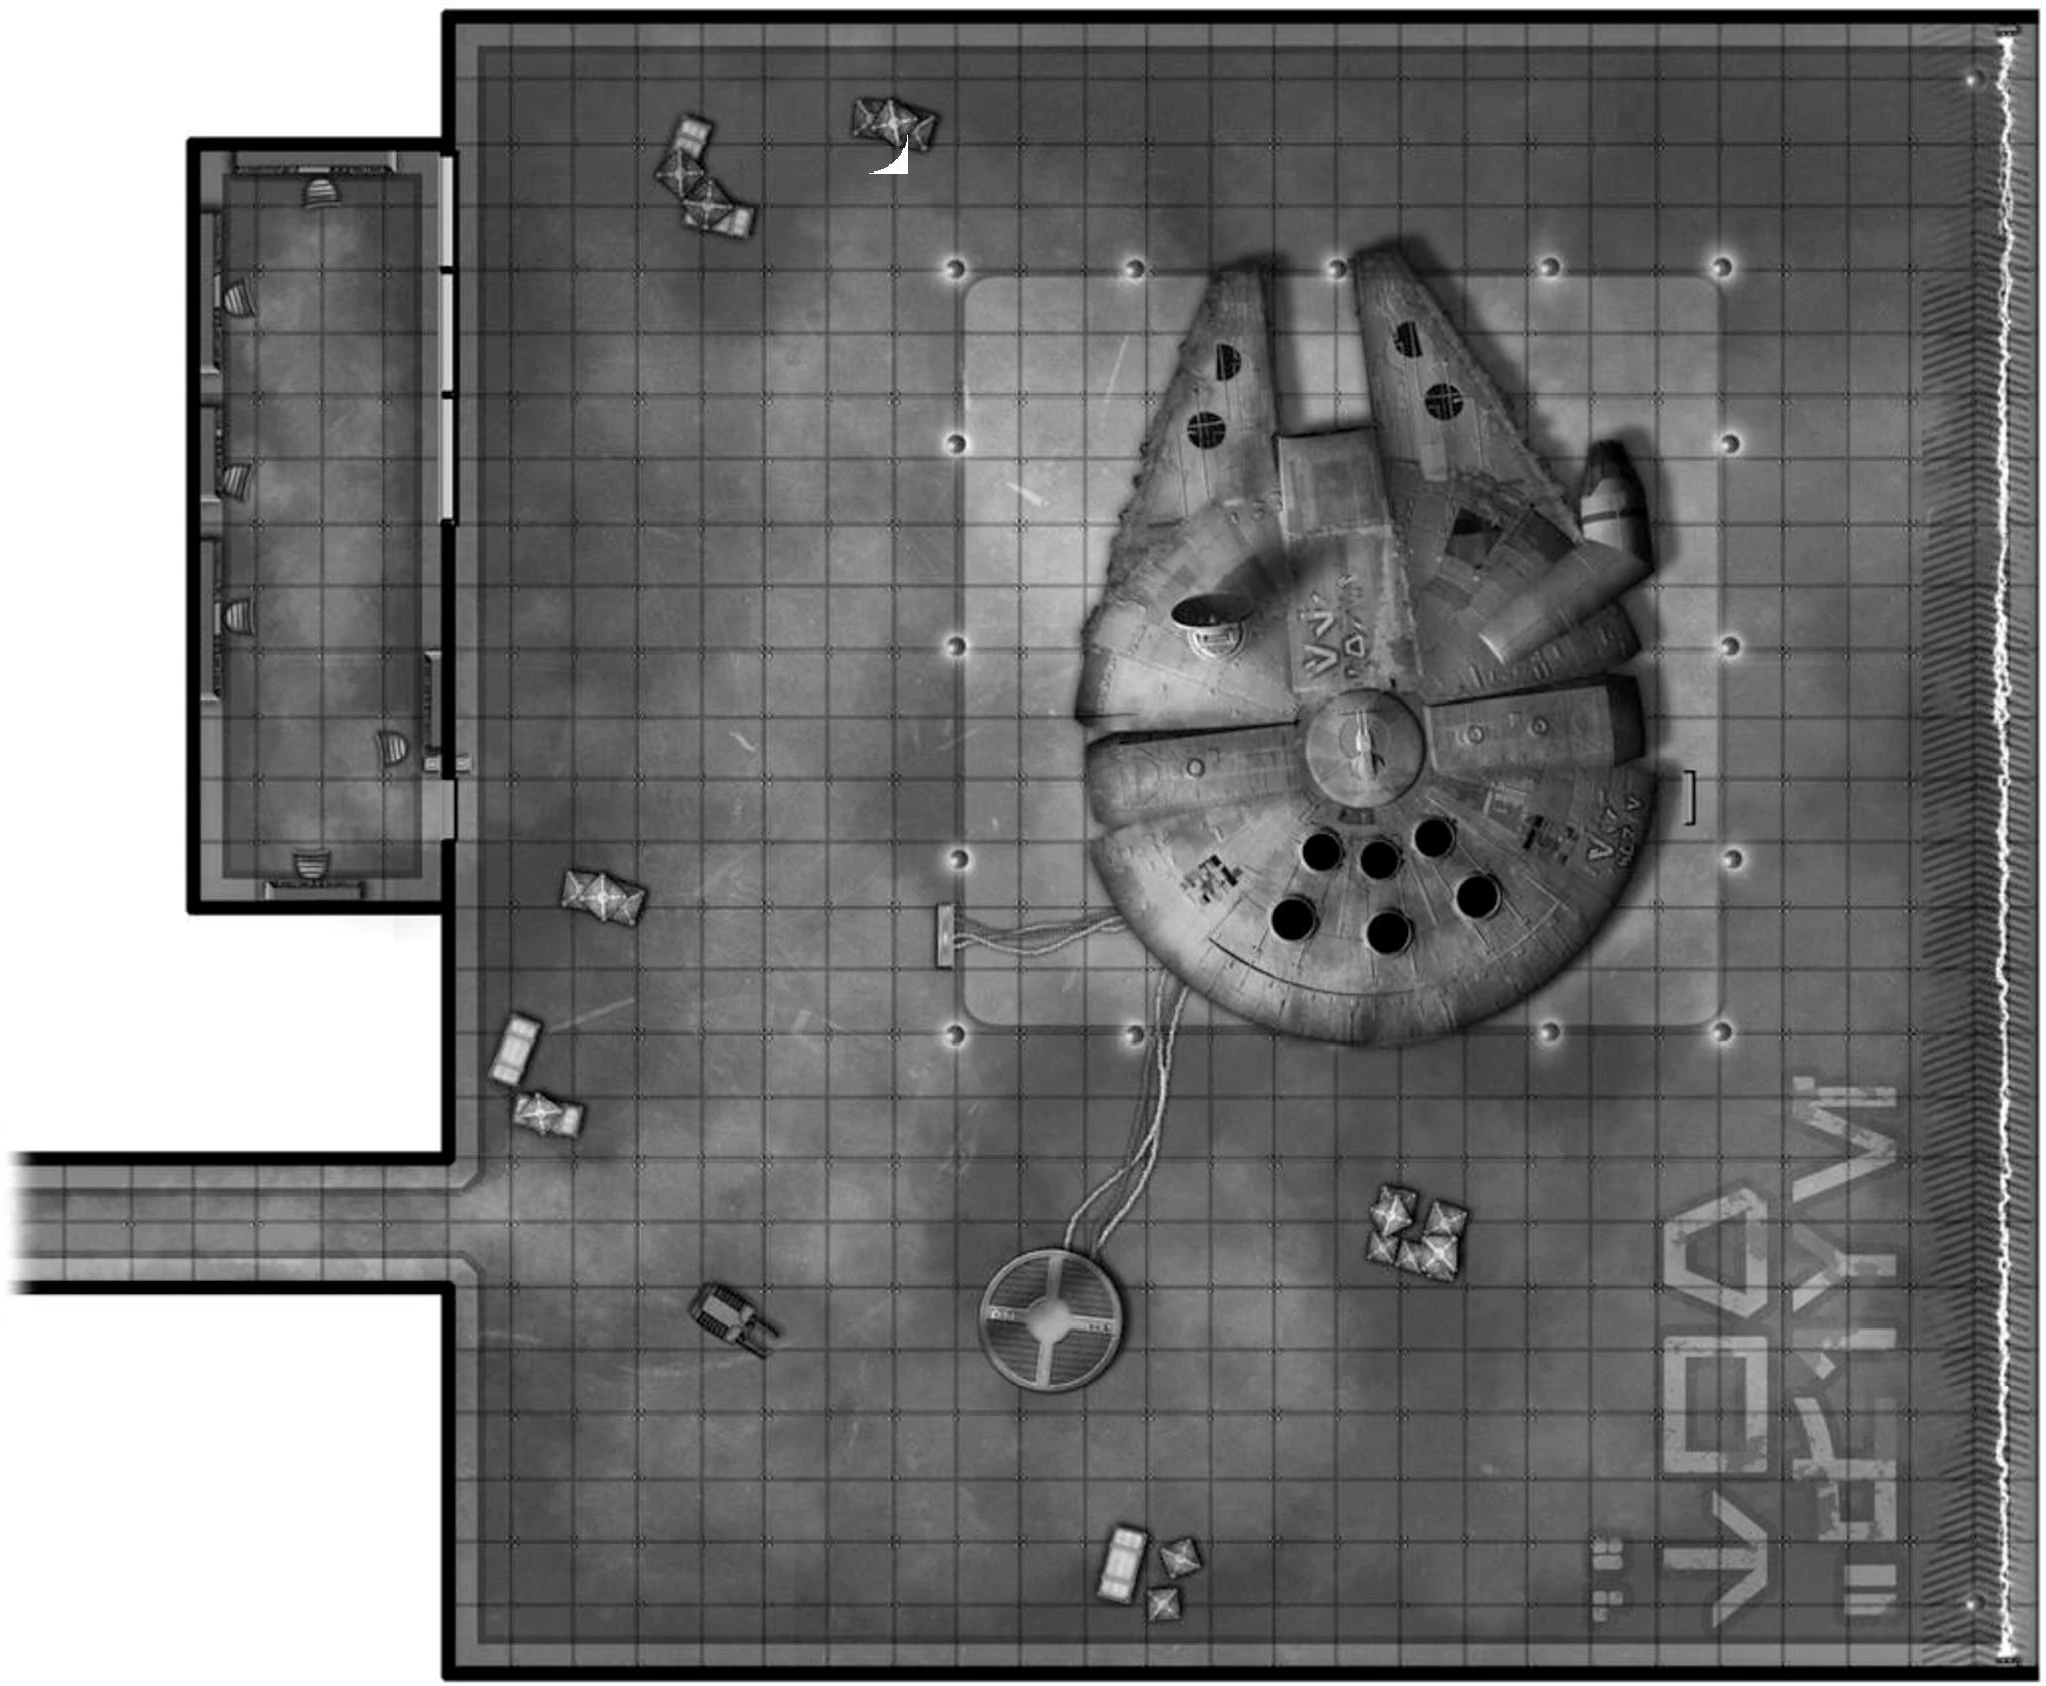
Docking Bay 616[]
The docking bay most likely used by the heroes to enter and leave the platform- Bay 616- is typically used by the Empire to rotate crewmembers on and off the platform via shuttlecraft. When Lady Aldrete's fleet arrived, most of the ships normally kept in this hangar (GAT-12h "Skiprays", command shuttles, and so on) either joined the fight or departed for the relative safety of the planet below. It is likely that only one ship (other than the heroes' vessel) occupies this hangar: a Sith Infiltrator used by Inquisitor Valin Draco.
If the heroes made a grand show of their entrance or took no precautions against being identified by the sensors, they find a welcoming party waiting for them. For more information on this encounter, see the below tactical encounter. After the heroes deal with the encounter, they can start making their way deeper into the platform.
If the heroes were cautious and managed to sneak their ship onto the platform, they might instead find the docking bay empty. In this case, they can deal with this encounter later, when they are attempting to fight their way back to their vessel as the station crumbles around them.
Read-Aloud Text[]
When the encounter begins, read or paraphrase the following aloud:
Before you stand some of the largest humanoids you've ever seen. Dressed in robes and carrying massive Vibro-Axes, these creatures lumber toward you as though they mean to stomp you into the deck plating. Worse, two small clusters of Stormtroopers advance on you as well, taking advantage of your momentary distraction to begin taking shots at you. These creatures and the Stormtroopers are clearly not interested in parley.
Encounter Setup[]
If the heroes deal with this encounter upon first arriving, the enemies approach from the interior of the docking bay, as though coming from deeper in the station. If the heroes deal with this encounter during their attempted departure, the enemies instead are waiting for them near their ship(s).
Tactics[]
First-Generation Imperial Sentinels are melee opponents. Each sentinel charges into the midst of the heroes if possible and tries to stay there, using Retaliation Jab to automatically deal damage to heroes who try to make melee attacks. They attempt to use Battering Attack to knock the heroes Prone, preventing them from escaping easily and keeping them close by.
The Byss Elite Stormtrooper Squads try to pen in any heroes who attempt to slip away from the sentinels. The two squads stay close to take advantage of Comrades in Arms and Focused Targeting, making them a bit more susceptible to Grenades and other Area Attacks.
Features of the Area[]
The hangar in which the encounter takes place is fairly typical. It has a metal floor, a tall ceiling (30 squares high), and enough space for several shuttles to land. Throughout the hangar are a number of crates, as well as ship maintenance and refueling equipment, that can be used as Cover. From behind a transparisteel window, Control Droids observe the hangar; however, they are only traffic control Droids and do not sound an alarm unless there is some problem with the ships in the hangar.
Conclusion[]
With the enemies dead or otherwise subdued, the heroes have access to the station's interior (or to their ships, if the encounter took place during their escape from the platform).
Getting to the Reactor[]
The heroes probably don't know that the main command bridge has been shut down and that control has been transferred to an auxiliary bridge near the main reactor. However, this should become clear when they reach the abandoned command bridge, or earlier if they tinker with the station's central computer system.
The heroes must make their way through dangerous territory to reach the central reactor area. If they have managed to keep their presence on the station a secret, they might have relatively free access to the corridors and turbolifts. However, in the more likely scenario that their presence has attracted some attention, most of the turbolifts leading toward the auxiliary bridge have been shut down as a part of security protocol. This doesn't mean that the heroes can't use the turbolift shafts to travel between levels, and they almost certainly must do so to reach their destination. Unfortunately, even an empty turbolift shaft has defenses, and the heroes must deal with several Security Droids before they can head toward the core.
This encounter consists of two landings, separated vertically by about 20 squares of vertical turbolift shaft. Four Shadow Security Droids descend from the top of the turbolift shaft; when the heroes first enter the shaft, they should see no sign of the Droids.
Read-Aloud Text[]
When the encounter begins, read or paraphrase the following aloud:
As you descend through the turbolift shaft, you hear the soft hum of repulsors coming from above. Looking up, you see four Droids that look to be black spheres bisected by a narrow disc. A Heavy Repeating Blaster hangs below each central orb, and red diodes sweep the area as though searching for targets.
Encounter Setup[]

Tactics[]
The Shadow Security Droids show little in the way of sophisticated tactics. Their goal is to find a good place to hover and unleash Full Attacks at the heroes. Since the Droids have a maximum altitude of 6 squares, they bounce between the small outcroppings in the turbolift shaft to avoid the heroes' fire.
Features of the Area[]
This particularly dangerous area consists of the turbolift shaft and two large landings. Four smaller outcroppings are spaced out every 4 squares; these small outcroppings are intended for service technicians and can be used by heroes descending down the shaft. A ladder leads down the shaft, passing between these platforms, allowing access to each landing.
Conclusion[]
When the heroes have defeated the Droids, they can make their way to the other end of the turbolift shaft unhindered.
Security Corridor[]
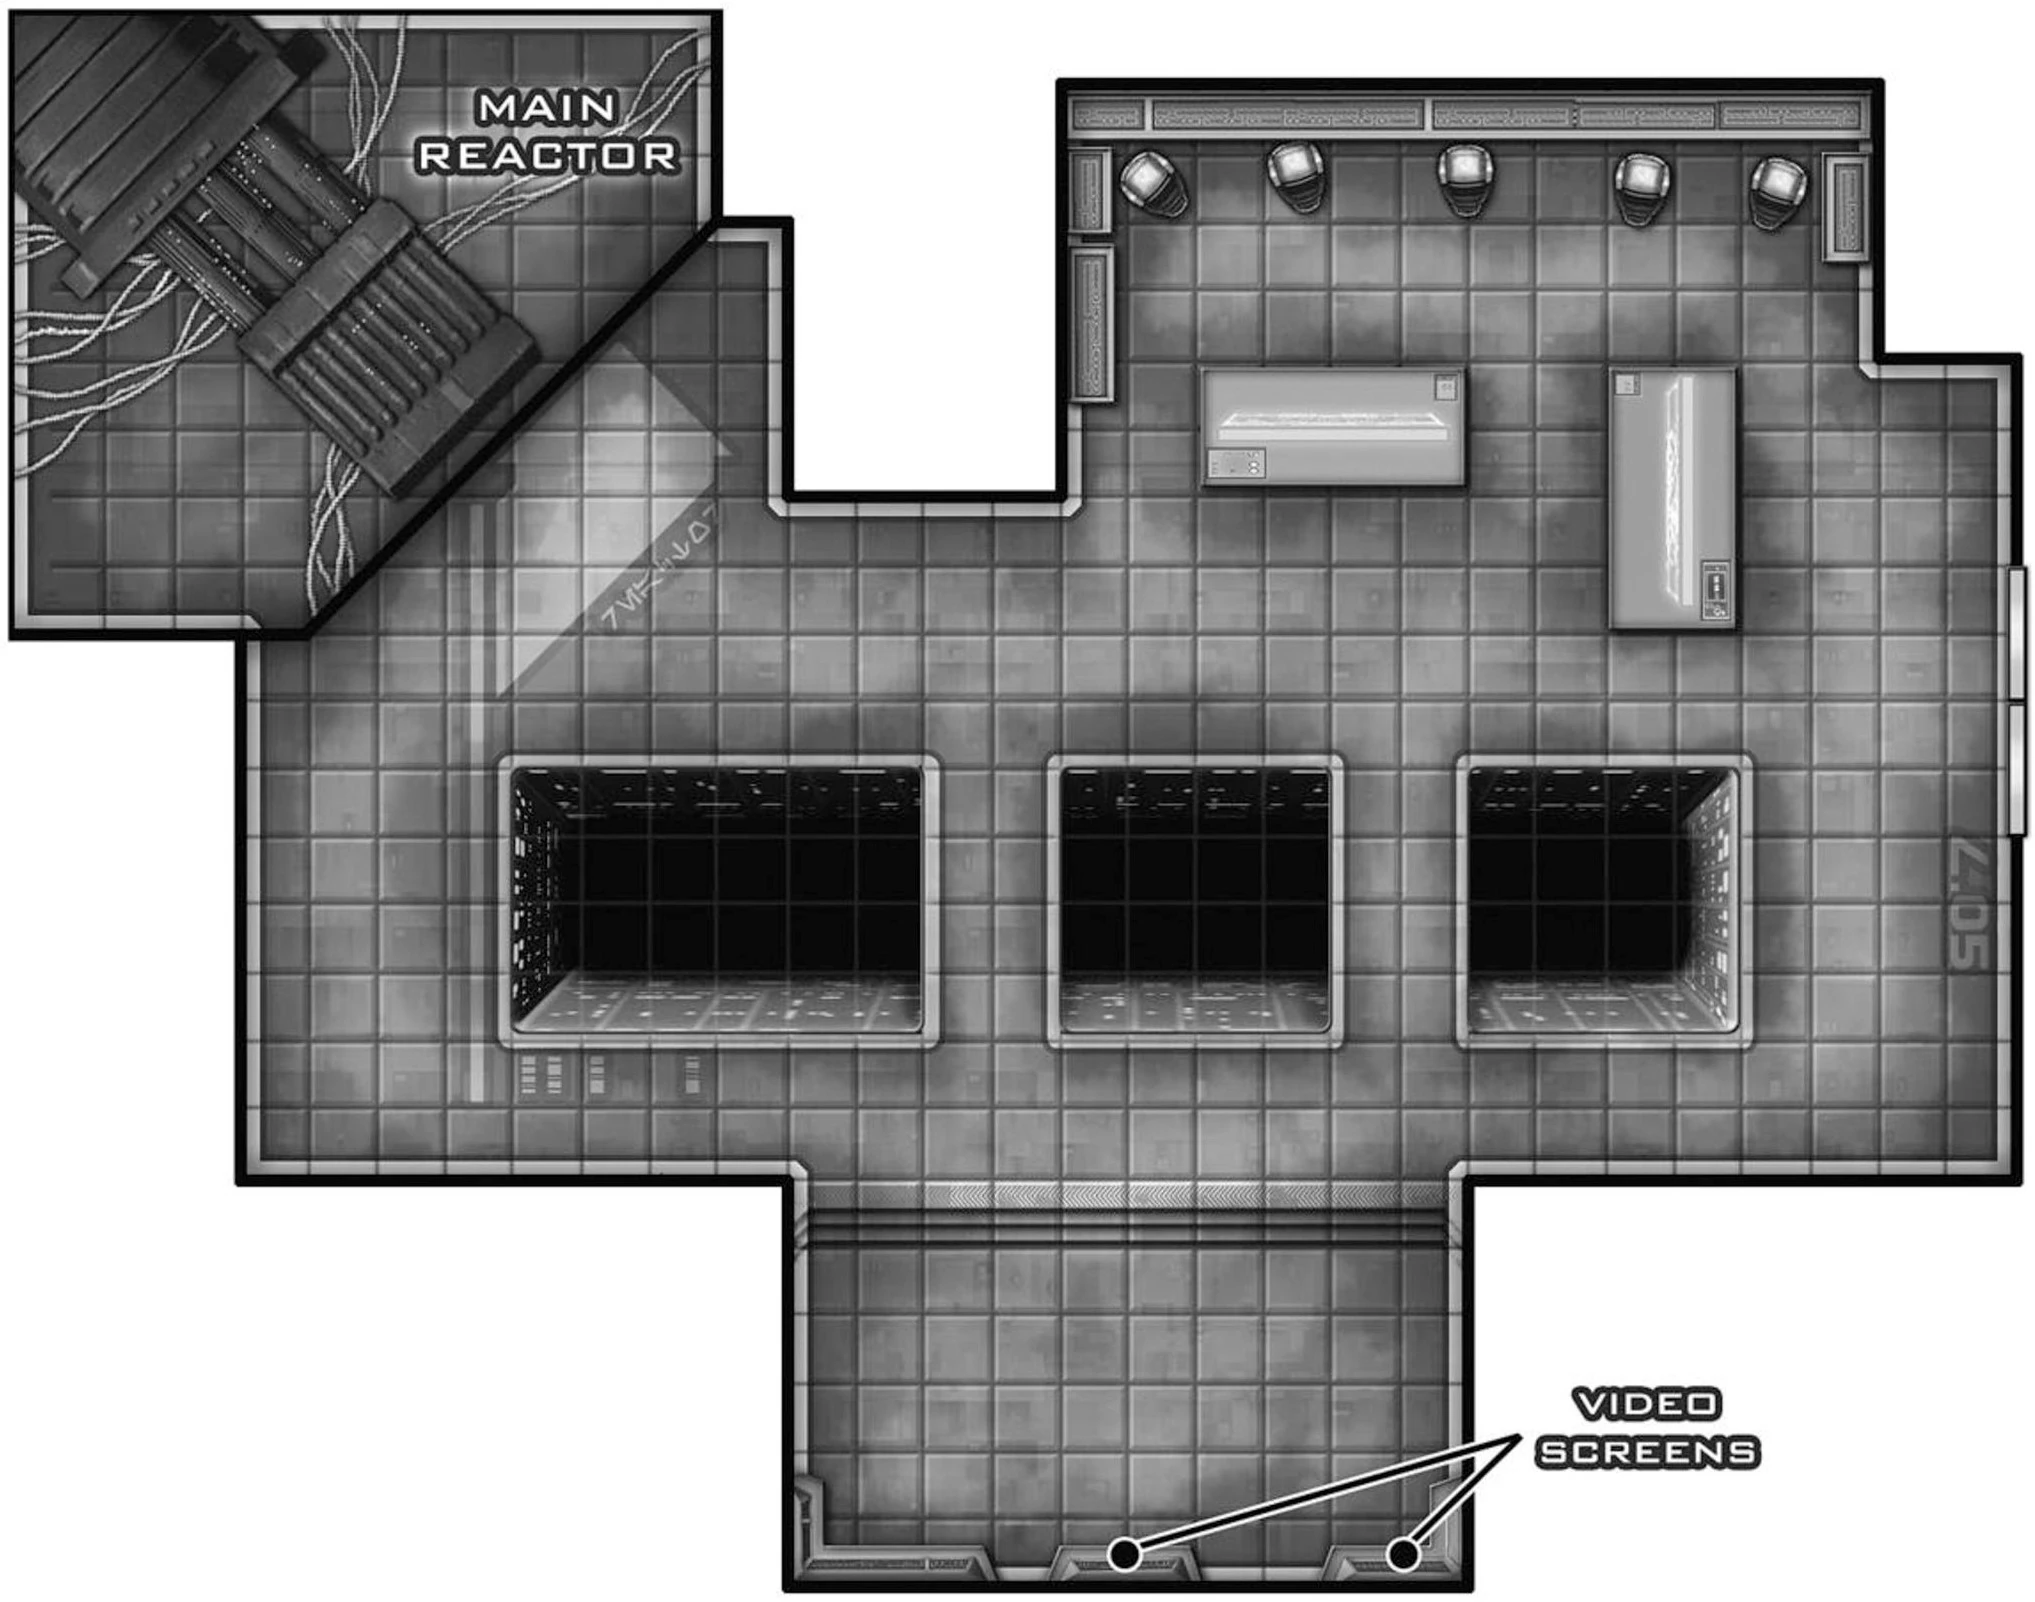
One encounter the heroes cannot avoid is the security corridor leading into the auxiliary command bridge and main reactor. The defenses in this corridor are always in place whenever the auxiliary command bridge is active (as it is now). This security corridor is the only way in or out of the auxiliary command bridge, and the heroes have a fight on their hands to reach it.
The access corridor leading to the auxiliary command bridge and main reactor is a one-way corridor designed to keep intruders out. The heroes must enter from the end opposite the blast doors leading into the reactor chamber, and the defenders place themselves in the way where they have cover. The Advanced Purge Trooper remains out of sight, down the side corridor, at the start of combat.
Read-Aloud Text[]
When the encounter begins, read or paraphrase the following aloud:
Before you is a long, narrow corridor with bulkheads protruding from each side, providing ample cover to the Stormtroopers within. At the far end are massive blast doors; warnings emblazoned on them can only mean that they lead to the main reactor. An E-Web Repeating Blaster sits in front of the doors, spewing laser fire to deter anyone from entering.
Encounter Setup[]
Tactics[]
The E-Web is the main deterrent that the heroes must deal with, and its Byss Elite Stormtrooper Gunner keeps the laser fire coming at all times. If only one enemy is easily visible, the gunner uses Burst Fire to maximize the damage dealt. However, the gunner also tries to catch as many of the heroes in Area Attacks as possible.
The E-Web emplacement grants the Byss Elite Stormtrooper Gunner a +5 competence bonus to all attack rolls with the E-Web Repeating Blaster, and provides Improved Cover against all attacks from targets on the opposite side of its barriers.
The focus of the Advanced Purge Trooper is on any Jedi or Force-using heroes, as well as on melee combatants. The Purge Trooper tries to use Staggering Attack on any Force-using heroes, reducing their effectiveness, while unleashing Full Attacks whenever possible.
Features of the Area[]
The hallway in which this encounter takes place is engineered to provide the maximum amount of Cover to the Stormtroopers while allowing the Advanced Purge Trooper to move about freely. Otherwise, the corridor has no outstanding features.
Conclusion[]
With the guardians of the corridor defeated, the heroes still need to gain access to the auxiliary command bridge beyond the blast doors. These doors are sealed from the inside but can be cut through by a Lightsaber, opened with a DC 31 Use Computer check, or disabled with a DC 31 Mechanics check and opened with a DC 26 Strength check. Opening the doors grants access to the main reactor chamber and the auxiliary command bridge.
The Final Showdown[]
When the heroes finally reach the auxiliary bridge, they find a familiar face awaiting them. Having seen visions of this encounter in The Force, Inquisitor Draco has allowed to the heroes to reach him, sure that his victory will end their aspirations for inspiring rebellion and earn him a spot near the top of the Empire. When the heroes first arrive at the auxiliary command bridge, read or paraphrase the following aloud:
The auxiliary command bridge is lit by the eerie red light of the main reactor. Standing near the junction between the two chambers is a sinister form of the cybernetically enhanced Inquisitor Draco, an ignited red-bladed Lightsaber humming in his hand. Stormtroopers stand at the ready throughout the room, and Imperial technicians seem to be working furiously at control panels throughout the chamber. A pair of black-robed Imperial Shadow Guards stand just behind the Inquisitor, flanking him, Lightsaber Pikes at the ready.
"You're too late, my friends, too late," sneers Draco. "Had I known, when our paths crossed so long ago on Almas, that you would become such a thorn in the Empire's side, I would have had the planet razed from orbit. Yet I did not, and here we stand. If you throw down your weapons now, I guarantee you a quick and painless death. As you can see, I have been looking forward to this meeting for some time now."
A large display screen on one side of room flickers to life, revealing the stern face of Admiral Varth, decked out in his resplendent Imperial admiral's uniform. "Draco, why aren't those Tractor Beams offline yet? We're losing valuable men out there."
Draco offers you a small smile and says, "In a moment, Admiral, your ship will be free of the station, and I will have disposed of these traitors in plenty of time for you to crush their fleet."
Inquisitor Draco has ordered his men to power down the Tractor Beams connecting the defense platform to the Super Star Destroyer. The heroes have only moments to stop that from happening before the Super Star Destroyer is free to destroy the fleet.
Last Stand of Valin Draco[]
When the encounter begins, Draco and the two Elite Shadow Guards are at the forefront, with the Byss Elite Stormtrooper Squads taking up advantageous positions toward the rear. Five Imperial Officers man the Tractor Beam control stations and continue to work throughout the encounter.
Read-Aloud Text[]
When the encounter begins, read or paraphrase the following aloud:
The reactor hums loudly and bathes the entire room in red light. Three red Lightsaber blades join in the hum, while five Imperial Officers continue to work frantically at their control stations. The Imperial Officers look frightened for their lives, but they look even more frightened of failing the Inquisitor.
Encounter Setup[]
- High Inquisitor Valin Draco
- 2 Byss Elite Stormtrooper Squads
- 2 Elite Shadow Guards
- 5 Imperial Officers

Once Draco finishes his speech and the encounter begins, the heroes have approximately 10 rounds to bring the Tractor Beams back up to full strength. There are five stations at which the Tractor Beams are being deactivated; each station is manned by an Imperial Officer. Once the beams are down fully, the Super Star Destroyer will be free to make the short microjump into the middle of the ongoing battle, where it will devastate the enemy fleet.
To restore the Tractor Beams, a hero must spend a Standard Action and make a DC 31 Use Computer check at each of the five consoles. If a successful check is made at each station, the Tractor Beams power back up to full strength, which will severely damage the Super Star Destroyer when it tries to jump.
If the heroes fail to restore the Tractor Beams, the outcome of the adventure is not strongly affected. Their failure merely alters the method by which the Super Star Destroyer is damaged enough for the heroes to fly inside of it in Part 3: Into the Sarlacc.
Tactics[]
Inquisitor Draco seeks to isolate any Jedi and deal with them himself. He sees himself as the future of the Empire, and he believes that to fulfill that role, he must exterminate the Jedi by hand, just as the Emperor did. Draco engages any Jedi in a duel, fighting to the death and trusting his Elite Shadow Guards to protect him from other heroes.
The Elite Shadow Guards have been tasked by Draco with occupying the heroes while he personally deals with any Jedi in the group. The Elite Shadow Guards engage any heroes displaying melee prowess first, hoping to neutralize them while the Byss Elite Stormtrooper Squads take care of others.
The Byss Elite Stormtrooper Squads have been told to remain to the rear and suppress anyone who tries to interfere with Draco and the Elite Shadow Guards. Thus, they take Cover and either make attacks or Suppress an Enemy to penalize the heroes' attacks.
Conclusion[]
With Draco and his minions defeated, the heroes have a chance to deal some serious damage to the Sarlacc Project before they leave the Golan platform. Once the station is damaged by turbolaser fire, the main reactor chamber becomes a much more dangerous place, and the heroes will need to flee quickly or face Severe Radiation.
Get to the Hangar![]
When the encounter with Draco is complete, the heroes find themselves confronted with the grimacing visage of Admiral Varth, who has watched the progress of the fight from the safety of the Sarlacc Project's bridge. Read or paraphrase the following aloud:
Admiral Varth scowls at you through the video screen, the bridge of the Super Star Destroyer visible in the background behind him. "Why couldn't you have been killed when Organa's fleet fell apart? At least you won't live to see me crush your new allies. This makes twice that I've had to wipe out your little insurrection; how many other deaths are on your hands?"
With that, the admiral turns and speaks to someone offscreen. "I want all available turbolasers to target the anchoring platform and fire when ready. Helm, engage the microjump. Let's end this farcical rebellion."
The platform rocks under your feet as turbolaser bolts slam into the station. The video display cuts out abruptly, and the computer monitors show a chilling sight- the Super Star Destroyer has jumped to Hyperspace, reappearing in the middle of the ongoing battle.
With that, the heroes find themselves in a dangerous position they likely never expected. The space platform has been critically damaged by the Sarlacc Project, but it hasn't quite been destroyed. The heroes have mere minutes to make their way to their ship before the defense platform disintegrates with them inside it. Already they can feel the station listing as it begins to fall into Byss' atmosphere. At this point, the heroes are running for their lives, but once they are free of the station, they will realize that there are bigger things at stake, such as the success and survival of their friends.
Continued in Part 3: Into the Sarlacc